Have Yourself a Merry Little Christmas Sheet Music PDF: A Comprehensive Guide
Discover readily available, free sheet music for “Have Yourself a Merry Little Christmas” in PDF format, accessible through platforms like Musescore and Sheetmusic-free.com.

“Have Yourself a Merry Little Christmas” is a beloved holiday classic, instantly recognizable and deeply cherished for its poignant lyrics and comforting melody. Finding sheet music PDF versions allows musicians of all levels to learn and perform this timeless piece. Numerous online repositories, such as Musescore.com and Sheetmusic-free.com, offer free downloads for piano, vocal arrangements (soprano, alto, tenor), and even mixed quintet configurations.
These resources provide access to arrangements by various composers, including options for solo piano, vocal performances with accompaniment, and unique instrumental combinations. The availability of sheet music PDF formats makes it incredibly convenient to practice and share the joy of this iconic Christmas song.
Historical Context of “Have Yourself a Merry Little Christmas”
Originally penned in 1944 by Hugh Martin and Ralph Blane for Judy Garland’s film “Meet Me in St. Louis,” the song initially carried a more melancholic tone reflecting wartime sentiments. Accessing sheet music PDF versions today reveals how the lyrics were later revised to offer a more hopeful message.
The song’s enduring appeal stems from its ability to resonate with listeners during times of both joy and hardship. Finding readily available sheet music PDF allows musicians to connect with this historical context while performing this enduring holiday standard.
Judy Garland’s Original Performance
Judy Garland’s poignant 1944 rendition in “Meet Me in St. Louis” established the song’s emotional core; Early sheet music PDF versions often reflect this initial, more subdued arrangement. Her performance, though initially considered a bit slow for radio, became iconic.
Today, accessing sheet music PDF allows musicians to study and recreate the nuances of Garland’s delivery. The availability of arrangements for piano, vocal, and mixed quintet demonstrates the song’s adaptability, stemming from Garland’s original interpretation.
The Song’s Evolution and Popularity
“Have Yourself a Merry Little Christmas” gained broader recognition after Frank Sinatra’s 1950 recording, prompting revised sheet music PDF arrangements. The song’s popularity surged, leading to numerous versions for various instruments – piano, guitar, flute, and more.
The proliferation of sheet music PDF downloads on platforms like Musescore.com reflects its enduring appeal. Different arrangements cater to varying skill levels, from beginner-friendly lead sheets to complex mixed quintet scores, ensuring continued accessibility.
Frank Sinatra’s Rendition and Impact
Frank Sinatra’s 1950 interpretation significantly boosted the song’s fame, driving demand for accessible sheet music PDF versions. His rendition, differing from Judy Garland’s original, became definitive for many. Consequently, numerous sheet music PDF arrangements emerged, including simplified piano solos and vocal scores.
The availability of Sinatra’s arrangement as a sheet music PDF on platforms like Musescore.com demonstrates his lasting influence. This accessibility allows musicians to learn and perform his iconic version, perpetuating the song’s legacy.
Where to Find “Have Yourself a Merry Little Christmas” Sheet Music PDF

Locating “Have Yourself a Merry Little Christmas” sheet music PDF is remarkably easy today. Musescore.com stands out as a primary resource, offering a vast library of free, user-submitted arrangements for piano, guitar, and various ensembles. Sheetmusic-free.com also provides downloadable sheet music PDF options.
Additionally, exploring other online repositories can yield further results. These platforms host diverse versions, catering to different skill levels and instrumentation needs, ensuring access to the perfect sheet music PDF.
Musescore.com as a Primary Source
Musescore.com is a leading platform for accessing “Have Yourself a Merry Little Christmas” sheet music PDF. It boasts an extensive collection, including arrangements by Chancellor Ross Wyman for piano, soprano, alto, tenor, and mixed quintet. Users can freely download and print these PDFs or convert them to MIDI format.
The site’s community-driven nature ensures a wide variety of interpretations and arrangements, making it an invaluable resource for musicians seeking sheet music PDF versions of this classic carol.
Sheetmusic-free.com Options
Sheetmusic-free.com provides a convenient source for downloading “Have Yourself a Merry Little Christmas” sheet music PDF, specifically tailored for piano, vocal, and guitar arrangements. The available PDF consists of five pages, presented in the original key of A, complete with lyrics for easy performance.
This website offers a straightforward download process, making it a quick option for musicians needing readily accessible sheet music PDF for this beloved Christmas song. It was last updated on July 19, 2019.
Other Online Sheet Music Repositories
Beyond Musescore and Sheetmusic-free.com, numerous online repositories offer “Have Yourself a Merry Little Christmas” sheet music PDF. While these weren’t specifically detailed in the provided text, a broader internet search will reveal additional options.

Musicians can explore various websites specializing in sheet music PDF downloads, potentially discovering unique arrangements or versions. Remember to verify the legality and copyright status before downloading and using any sheet music PDF found on these platforms.
Sheet Music Arrangements Available
A diverse range of arrangements for “Have Yourself a Merry Little Christmas” sheet music PDF are readily available. Options include piano solos and accompaniment, vocal arrangements tailored for Soprano, Alto, and Tenor voices, and even arrangements for a Mixed Quintet.

Furthermore, arrangements exist for instruments like guitar and flute, expanding accessibility. These sheet music PDF versions cater to various skill levels and ensemble configurations, offering musicians plentiful choices for performance and practice.
Piano Arrangements: Solo and Accompaniment
Numerous “Have Yourself a Merry Little Christmas” sheet music PDF options exist specifically for piano. These range from simplified solo arrangements, ideal for beginners, to more complex pieces with full accompaniment.
Musescore.com features lead sheets with chords, facilitating easy piano playing; Skilled pianists can find arrangements demanding greater technical proficiency. The availability of both solo and accompaniment versions allows for versatile performance styles, catering to diverse musical preferences.
Vocal Arrangements: Soprano, Alto, Tenor
Finding “Have Yourself a Merry Little Christmas” sheet music PDF tailored for different vocal ranges is achievable. Musescore.com provides arrangements specifically for Soprano, Alto, and Tenor voices, often within mixed quintet scores.
These vocal arrangements include melody lines and lyrics, enabling choirs or individual singers to perform the song. Arrangements cater to varying skill levels, ensuring accessibility for both amateur and experienced vocalists. The availability of multiple vocal parts enhances ensemble performance possibilities.
Mixed Quintet Arrangements
Explore “Have Yourself a Merry Little Christmas” sheet music PDF options designed for mixed quintets – ensembles typically comprising piano, soprano, alto, tenor, and bass voices. Musescore.com features arrangements by creators like Chancellor Ross Wyman, specifically scored for this instrumentation.
These arrangements offer a richer harmonic texture and allow for dynamic interplay between vocal and instrumental parts. Quintet scores often include detailed vocal harmonies and piano accompaniment, creating a full and festive sound.
Guitar and Flute Arrangements
Discover diverse sheet music PDF options for “Have Yourself a Merry Little Christmas” tailored for guitar and flute. Musescore.com hosts arrangements catering to these instruments, offering unique interpretations of the classic carol.

Guitar arrangements range from simple chord charts for accompaniment to more intricate fingerstyle pieces; Flute arrangements provide melodic lines suitable for solo performance or ensemble playing. These versions offer a lighter, more intimate feel compared to full orchestral scores.
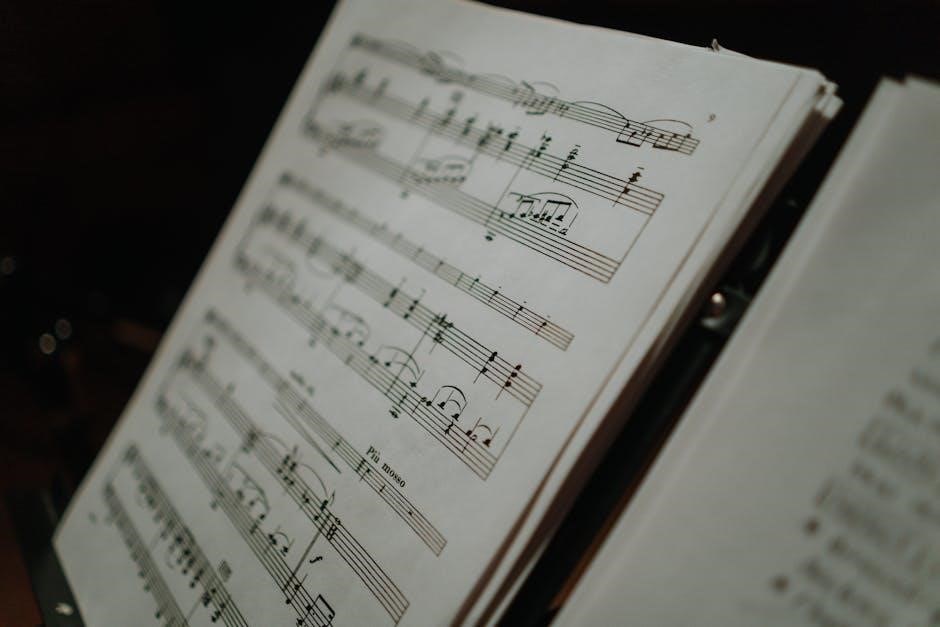
Understanding Sheet Music Notation
Decoding “Have Yourself a Merry Little Christmas” sheet music PDF requires familiarity with musical notation. Key signatures indicate sharps or flats, while time signatures define the rhythm. Chord symbols, like Amin7 or C, guide harmonic accompaniment.
Understanding these elements unlocks the song’s structure. Recognizing note values (whole, half, quarter) and rests is crucial for accurate timing. Familiarity with musical terms enhances interpretation, allowing musicians to breathe life into the beloved carol.
Key Signatures and Time Signatures
Analyzing “Have Yourself a Merry Little Christmas” sheet music PDF reveals its key signature, often A major, dictating sharps or flats. The time signature, frequently 12/8, influences the song’s waltz-like feel.
These signatures are fundamental. A major establishes the tonal center, while 12/8 indicates four beats per measure, each divided into triplets. Understanding these elements is vital for accurate performance and interpreting the composer’s intended rhythm and harmony.
Chord Symbols and Progressions
Examining the “Have Yourself a Merry Little Christmas” sheet music PDF showcases common chord symbols like C, Am7, and Fmaj7. The progression often revolves around a gentle, cyclical pattern, creating a nostalgic mood.
These chords, frequently used in jazz and popular music, contribute to the song’s harmonic richness. Recognizing these progressions aids musicians in improvisation and understanding the song’s emotional core, enhancing their performance.
Lyric Integration in Sheet Music
Analyzing “Have Yourself a Merry Little Christmas” sheet music PDF versions reveals lyrics are consistently integrated directly beneath the musical notation. This facilitates seamless performance for vocalists and instrumentalists alike.
The clear presentation of lyrics, aligned with the melody, ensures accurate phrasing and emotional delivery. Many PDFs, particularly those from Musescore, prioritize readability, making it easy to follow both the music and the heartfelt words of this classic carol.

Different Versions and Keys
Exploring “Have Yourself a Merry Little Christmas” sheet music PDF options reveals variations in keys and arrangements. The original key is A, frequently found on Sheetmusic-free.com, but transposing to different keys is common for vocal ranges.
Musescore.com offers lead sheets with chords, simplifying piano accompaniment. Arrangements cater to diverse skill levels, and versions exist for solo piano, vocal performances (soprano, alto, tenor), and even mixed quintets, providing flexibility for musicians.
Original Key of A
The foundational key for “Have Yourself a Merry Little Christmas” sheet music PDF is A, as initially published and commonly found on platforms like Sheetmusic-free.com. This key suits many vocalists, but adjustments are often necessary.
While A provides a classic sound, musicians frequently transpose the music to better fit their vocal range or instrumental capabilities. Understanding the original key is crucial for accurate interpretation and adaptation when exploring different arrangements available online.
Transposing the Sheet Music to Different Keys
Adapting “Have Yourself a Merry Little Christmas” sheet music PDF to different keys is common practice. Musicians utilize transposition to accommodate vocal ranges or instrumental limitations. Software like Musescore facilitates easy key changes, altering both notation and chords.
When transposing, ensure all accidentals and key signatures are correctly adjusted to maintain harmonic integrity. Consider the impact on vocal comfort and instrumental playability when selecting a new key. Experimentation is key to finding the optimal fit!
Lead Sheet with Chords for Easy Piano
For simplified piano playing, a lead sheet version of “Have Yourself a Merry Little Christmas” sheet music PDF provides melody and chord symbols. Musescore.com offers free downloads of such arrangements, ideal for beginners or those preferring a minimalist approach.
These lead sheets typically omit detailed notation, focusing on essential harmonic progressions. Players can improvise accompaniment patterns based on the provided chords; This format encourages creativity and allows for personalized interpretations of the beloved carol.
Copyright and Usage Rights
When utilizing sheet music PDF versions of “Have Yourself a Merry Little Christmas,” understanding copyright is crucial. Personal use, such as private practice or enjoyment, is generally permitted. However, public performance or distribution may require licensing or permission from the copyright holder.
Arrangements, like David Cornell’s concertina version, carry separate copyrights. His arrangement is granted for personal use and newsletters, highlighting the importance of respecting creators’ rights. Always verify usage terms before sharing or performing any arrangement.
Personal Use vs. Public Performance
Downloading a “Have Yourself a Merry Little Christmas” sheet music PDF for individual practice falls under fair use, allowing personal enjoyment without licensing. However, performing the song publicly – in a concert, church service, or even a streamed online event – necessitates securing performance rights.
Similarly, distributing copies, even non-profit, requires permission. Understanding this distinction protects both musicians and copyright holders, ensuring proper compensation and legal compliance when sharing this beloved holiday tune.
Arrangement Copyrights (David Cornell Example)
While the original composition of “Have Yourself a Merry Little Christmas” is copyrighted, arrangements like David Cornell’s duet concertina version introduce a separate layer of copyright protection. Cornell retains rights to his specific arrangement, even with free distribution for personal use.
This means copying and reselling Cornell’s arrangement is prohibited. The original song’s copyright and arrangement copyrights coexist, requiring consideration for both when utilizing any sheet music PDF version.
Printing and Formatting PDF Sheet Music
When printing your downloaded “Have Yourself a Merry Little Christmas” sheet music PDF, optimize settings for clarity. Ensure page size matches your printer’s capabilities, and select “fit to page” to avoid cropping. Consider grayscale printing to conserve ink.
Preview before printing to verify legibility of notes and lyrics. Digital sheet music software compatibility, like Musescore, allows adjustments before final PDF creation, ensuring a well-formatted, playable copy.
Optimizing PDF for Printing
To achieve the best print quality for your “Have Yourself a Merry Little Christmas” sheet music PDF, select high-resolution settings during PDF creation. Flatten layers within the document to prevent printing issues. Ensure all fonts are embedded to maintain consistency.
Adjust margins to maximize space while preserving readability. Preview the PDF before printing to confirm accurate layout and avoid unwanted cropping of musical notation or lyrics.
Page Size and Layout Considerations
When printing “Have Yourself a Merry Little Christmas” sheet music PDF, standard letter size (8.5 x 11 inches) is generally suitable. However, consider A4 size for international compatibility. Ensure the layout is clean and uncluttered, with sufficient space between staves and lyrics.
Avoid excessively small font sizes that compromise readability. Proper page orientation (portrait) is crucial for standard musical notation. Preview the print layout to confirm everything fits neatly on each page.
Digital Sheet Music Software Compatibility
Downloaded “Have Yourself a Merry Little Christmas” sheet music PDF files are widely compatible with various software. Musescore is a popular, free option for viewing, editing, and playing the music. Other compatible programs include Finale, Sibelius, and ForScore.
Ensure your software supports PDF import. Some programs may require specific plugins or updates for optimal viewing. Compatibility ensures seamless access and manipulation of the sheet music for practice and performance.
Musescore Software
Musescore stands out as a premier platform for accessing and utilizing “Have Yourself a Merry Little Christmas” sheet music PDF. It’s a free, open-source music notation software allowing users to view, play, edit, and even create arrangements.
The platform hosts numerous user-submitted scores, including various arrangements for piano, vocals, and ensembles. Musescore’s intuitive interface and robust features make it ideal for musicians of all levels seeking accessible sheet music.
Other Compatible Software
Beyond Musescore, several other software options support PDF sheet music viewing and playback for “Have Yourself a Merry Little Christmas”. Programs like Finale Reader, Sibelius First, and even standard PDF readers with annotation capabilities can be utilized.
These alternatives offer varying levels of functionality, from simple viewing to more advanced editing features. Choosing the right software depends on individual needs and desired level of interaction with the sheet music PDF.
Learning Resources for Playing the Song
Enhance your performance of “Have Yourself a Merry Little Christmas” with readily available online resources. Numerous piano tutorials on platforms like YouTube offer step-by-step guidance for various skill levels, complementing the sheet music PDF.
Vocal coaching resources can refine your interpretation, while duet arrangements encourage collaborative practice. Mastering the song becomes more accessible with these supplementary learning tools, improving both technique and musicality.
Online Piano Tutorials

Numerous online piano tutorials provide accessible learning for “Have Yourself a Merry Little Christmas,” complementing your sheet music PDF. These resources cater to diverse skill levels, from beginner-friendly introductions to advanced techniques.
Many tutorials break down the song’s chord progressions and melodies, offering visual aids and play-along options. Utilizing these tutorials alongside the sheet music accelerates learning and enhances your overall performance of this beloved holiday classic.
Vocal Coaching Resources
Enhance your vocal performance of “Have Yourself a Merry Little Christmas” with readily available online coaching resources. These resources, used alongside your sheet music PDF, focus on breath control, phrasing, and emotional delivery.
Many vocal coaches offer tutorials specifically tailored to this song, guiding you through its nuances. Mastering the vocal techniques will allow you to beautifully interpret the song’s heartfelt lyrics and create a truly moving rendition.
Duet and Ensemble Arrangements
Elevate your holiday performances with duet and ensemble arrangements of “Have Yourself a Merry Little Christmas,” easily found as sheet music PDFs. Explore options for mixed quintets, featuring arrangements for piano, soprano, alto, and tenor voices.
Discover unique concertina duet arrangements, like those by David Cornell, perfect for intimate settings. These arrangements add depth and harmony, transforming the classic song into a collaborative musical experience.
Concertina Arrangements
For concertina enthusiasts, specialized sheet music PDF arrangements of “Have Yourself a Merry Little Christmas” offer a unique playing experience. David Cornell provides a notable duet arrangement, granting rights for personal use and newsletters.
These arrangements, often dating back to the early 2000s, showcase the song’s adaptability to this charming instrument. Explore these less common, yet delightful, options to add a distinctive touch to your holiday repertoire.
Arrangements for Various Instrument Combinations
Beyond solo pieces, “Have Yourself a Merry Little Christmas” sheet music PDF options extend to diverse instrument combinations. Notably, arrangements exist for Mixed Quintets, encompassing piano, soprano, alto, and tenor parts, readily available on MuseScore.com.
These ensemble arrangements provide opportunities for collaborative performances, enriching the musical experience. Discover arrangements tailored to your specific group, fostering harmonious renditions of this beloved holiday classic.
Sheet Music Difficulty Levels
“Have Yourself a Merry Little Christmas” sheet music PDF caters to all skill levels. Beginner-friendly arrangements, often lead sheets with chords for easy piano solo, simplify the song’s harmonic structure.
Intermediate and advanced players can explore more complex arrangements with fuller instrumentation and intricate harmonies. These variations offer a progressive learning curve, allowing musicians to refine their skills while enjoying this timeless Christmas carol.
Beginner-Friendly Arrangements
Beginner pianists will find simplified “Have Yourself a Merry Little Christmas” sheet music PDFs readily available. These often feature lead sheets with basic chord progressions, focusing on melody and fundamental harmonies.
Musescore.com provides options for solo piano arrangements, easing the learning process. These arrangements prioritize readability and minimize complex rhythms, making the song accessible for those new to playing the piano or reading sheet music.

Intermediate and Advanced Arrangements
For skilled musicians, more complex “Have Yourself a Merry Little Christmas” sheet music PDFs exist. These arrangements often include intricate harmonies, elaborate piano accompaniments, and sophisticated voicing for mixed quintets.
Musescore.com hosts arrangements demanding greater technical proficiency, featuring fuller orchestrations and challenging rhythmic patterns. David Cornell’s duet concertina arrangement exemplifies advanced options, requiring significant musical expertise. These PDFs cater to performers seeking a richer, more nuanced interpretation.
The Enduring Legacy of the Song
“Have Yourself a Merry Little Christmas” continues to resonate deeply, with its sheet music PDFs remaining consistently popular downloads. The song’s timeless message of hope and comfort ensures its presence in countless holiday performances.
Its frequent appearances in popular culture, alongside readily available arrangements for diverse instruments, solidify its enduring appeal. Access to free PDFs on platforms like Musescore.com sustains the song’s legacy, allowing new generations to enjoy and interpret this classic.
“Have Yourself a Merry Little Christmas” in Popular Culture
The song’s pervasive presence in films, television, and commercials has cemented its status as a holiday staple. The easy availability of sheet music PDFs, particularly through sites like Musescore, fuels its continued performance and adaptation.
Numerous artists have covered the song, further amplifying its reach. The accessibility of free arrangements encourages musicians of all levels to include it in their repertoire, ensuring its enduring relevance during the festive season.
Its Continued Relevance During the Holiday Season
The song’s poignant lyrics resonate with themes of hope and togetherness, making it particularly meaningful during the holidays. The widespread availability of “Have Yourself a Merry Little Christmas” sheet music PDFs, easily downloaded from platforms like Musescore and Sheetmusic-free.com, ensures its continued performance.
This accessibility empowers musicians to share the song’s comforting message, solidifying its place as a beloved tradition for generations. The ease of obtaining arrangements sustains its yearly resurgence.