
Today, January 26, 2026, this manual details operation of the device, emphasizing battery removal for storage exceeding three months to prevent leakage.
Overview of the Device
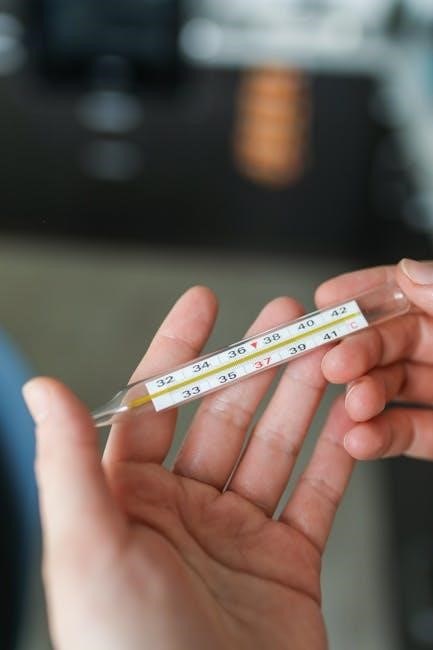
The ETN4-1999 is an all-in-one thermostat designed for DIN-rail mounting within approved cabinets, catering to diverse applications. Power the device by pressing the power button; a temperature reading is obtained by aiming and holding the trigger, ensuring at least 1cm probe insertion.
Key Features and Benefits
This thermometer offers preset temperature stages, like 65°C, and features automatic shut-off after 30 minutes of inactivity or 3 minutes without measurement. Accurate readings, up to 1.10°C, are achievable through deviation adjustments using the F-5 setting, enhancing overall usability.

Understanding the Components
The device includes a thermometer probe, control buttons for operation, and a display screen for readings; internal components are accessed by removing the control knob.
Thermometer Probe Details
For accurate measurements, insert the probe at least 1cm into the material being tested. The probe is a critical component for temperature sensing, and proper insertion ensures reliable readings. Careful handling prevents damage and maintains accuracy over time, crucial for all applications.
Control Buttons and Their Functions
The device is activated by pressing button (1) to power on, and again to power off. Holding the trigger while measuring maintains the temperature reading upon release. Manual shut-off conserves battery life, alongside the automatic 30-minute inactivity timeout feature.
Display Screen Explanation
The display showcases the measured temperature, potentially including a preset stage of 65°C when activated via a three-second press of the ‘Temp’ button. Readings are held after trigger release, providing clear and consistent temperature data for various applications.

Operating Instructions
To begin, press the power button to activate. Aim the probe at least 1cm into the target material, pull and hold the trigger for a reading.
Powering On and Off
Activation is simple: press the designated power button (labeled ‘1’) to initiate device operation. To deactivate and conserve battery life, press the same button again.
The thermometer also features automatic shut-off after 30 minutes of inactivity, or 3 minutes if powered on but not used.
Taking a Temperature Measurement
For accurate readings, aim the thermometer probe at the target material. Fully depress and hold the trigger during measurement. Releasing the trigger will maintain the displayed temperature reading on the screen.
Ensure at least 1cm probe insertion into the measured material for optimal results.
Trigger Mechanism and Reading Hold
The trigger activates temperature measurement; maintaining pressure is crucial for live readings. Upon release, the thermometer automatically holds the last recorded temperature on the display screen, allowing for convenient observation.
This feature eliminates the need to constantly hold the device.
Calibration and Adjustment
To ensure accuracy, adjust the thermometer using the F-5 general deviation setting, allowing for corrections up to 1.10°C as needed for precise readings.
Setting the General Deviation Value (F-5)
For temperature adjustments, utilize the F-5 setting to address deviations up to 1.10°C. This calibration feature ensures accurate measurements by compensating for minor inconsistencies. Proper setting is crucial for reliable results, particularly in critical applications requiring precision and consistency.
Adjusting for Temperature Accuracy (Up to 1.10°C)
To refine readings, adjust the thermometer if deviations exceed 1.10°C. Employ the general deviation value, F-5, for calibration. This process ensures optimal precision, vital for applications demanding accurate temperature assessment and consistent, dependable performance in varied environmental conditions.

Battery Management
Remove the battery when the thermometer isn’t used for three months or longer; failure to do so may cause leakage or heat generation.
Battery Installation and Replacement
The manual doesn’t explicitly detail battery installation, but emphasizes removal for prolonged non-use. Always disconnect power before any maintenance. Ensure correct polarity during future replacement, though specifics aren’t provided. Prioritize safety and prevent potential leakage by following these guidelines.
Removing the Battery for Long-Term Storage
To prevent fluid leakage, heat generation, or potential bursting, the manual strongly advises removing the battery if the thermometer won’t be used for three months or more. This crucial step ensures device longevity and safety during extended periods of inactivity, safeguarding internal components.
Automatic Shut-Off Features
The thermometer conserves battery life through automatic shut-off. It will power down 30 minutes after use without any button presses. Additionally, if turned on but left unused, it automatically shuts off after just 3 minutes, maximizing operational efficiency and battery preservation.

Maintenance and Troubleshooting
Regularly clean the probe to ensure accurate readings. Address any fluid leakage immediately, as it may indicate battery issues or potential device bursting.
Cleaning the Thermometer Probe
To maintain accuracy, regularly clean the thermometer probe. Use a soft cloth with mild soap and water. Ensure no liquid enters the device. Dry thoroughly before use. Avoid abrasive cleaners, as they can damage the sensitive probe tip, impacting temperature readings.
Addressing Potential Fluid Leakage
Fluid leakage is a concern if the thermometer isn’t stored properly. Remove the battery for periods exceeding three months. If leakage occurs, avoid contact with skin and eyes. Dispose of the device responsibly, following local regulations for battery and electronic waste disposal.
Dealing with Heat Generation Issues
Heat generation can occur with prolonged inactivity or improper battery storage. Removing the battery for extended non-use (over three months) mitigates this risk. Avoid exposing the thermometer to direct sunlight or extreme temperatures, as this exacerbates potential heat build-up within the device.
Disassembly and Electrical Connections
Disassembly involves removing the control knob (A) and unscrewing the cover (B) to access internal components and wiring, as illustrated in diagrams.
Removing the Control Knob
To begin disassembly, carefully remove the control knob, labeled as ‘A’ in accompanying diagrams. This action initiates access to the device’s internal components. Ensure a gentle approach to avoid damaging the surrounding casing or any connected mechanisms during removal.
Unscrewing the Cover and Accessing Internal Components
Following knob removal, locate and unscrew the designated screw, marked as ‘B’. Gently lift the cover upwards once the screw is removed. This provides clear access to the thermometer’s internal wiring and components for maintenance or repair procedures.
Wiring Diagram and Electrical Connections
After cover removal, internal electrical connections become visible. Refer to the provided wiring diagram for correct component placement and connectivity. Ensure all connections are secure before reassembling the device, preventing malfunctions and maintaining accurate temperature readings.
Safety Precautions
Always remove the battery during prolonged storage to avoid potential fluid leakage, heat generation, or even a bursting hazard within the device.
Avoiding Bursting Due to Battery Issues
Critical safety advice: Always disconnect the battery if the thermometer remains unused for over three months. Leaving batteries installed for extended periods significantly increases the risk of chemical leakage. This leakage can generate internal pressure, potentially leading to a dangerous bursting scenario, so prioritize battery removal.
Proper Handling of the Thermometer Probe
For accurate readings: Ensure at least 1cm of the probe is inserted into the material being measured. Handle with care to avoid damage. Avoid bending or excessive force, as this could compromise the probe’s integrity and affect temperature measurement precision over time.
General Safety Guidelines
Crucially, remove the battery if the thermometer isn’t used for three months or longer to prevent potential fluid leakage, heat generation, or even bursting. Manual shut-off conserves battery life; automatic shut-off occurs after 30 minutes of inactivity or 3 minutes without use.
Technical Specifications
This device, the ETN4-1999, is designed for DIN-rail mounting within approved cabinets, covering diverse application needs with precise temperature measurement capabilities.
Temperature Range
The thermometer’s operational temperature range isn’t explicitly stated in the provided excerpts; however, its application in industrial monitoring, HVAC checks, and food safety suggests a broad spectrum. Accurate readings require calibration, adjusting for deviations up to 1.10°C, ensuring reliable performance across varied environments.
Accuracy and Resolution
Achieving optimal accuracy necessitates calibration, allowing for adjustments up to 1.10°C to compensate for potential deviations. While specific resolution details aren’t provided, the device’s intended applications – industrial, HVAC, and food safety – demand precise temperature measurements for reliable results and safety.
Power Source
The thermometer operates on batteries, requiring careful management for longevity and safety. Removing the battery during prolonged non-use – exceeding three months – is crucial to prevent potential issues like fluid leakage, heat generation, or even battery bursting, ensuring device reliability and user protection.
Applications
This versatile thermometer suits industrial monitoring, HVAC checks, and critical food safety temperature assessments, offering broad utility across diverse professional and practical scenarios.
Industrial Temperature Monitoring
For industrial uses, the 3-in-1 thermometer provides precise temperature readings crucial for maintaining equipment efficiency and safety. Regular monitoring helps prevent overheating, identifies potential malfunctions, and ensures optimal performance of machinery and processes, contributing to reliable operations.
HVAC System Checks
Utilize this thermometer to verify HVAC system performance by measuring air temperatures at vents and returns. Confirm proper refrigerant flow and identify potential issues like blocked ducts or failing components. Accurate readings ensure efficient heating and cooling, optimizing energy usage and comfort levels.
Food Safety Temperature Checks
Ensure food safety by accurately measuring internal temperatures of meats, poultry, and seafood. Verify cooking temperatures meet recommended guidelines to eliminate harmful bacteria. This thermometer aids in preventing foodborne illnesses, crucial for restaurants, catering, and home cooking, guaranteeing safe consumption.
DIN-Rail Mounting (ETN4-1999 Model)
The ETN4-1999 is designed for DIN-rail mounting within an approved cabinet, fulfilling diverse application needs, requiring specific wiring for proper installation.
Approved Cabinet Requirements
For ETN4-1999 installation, utilize only cabinets meeting safety standards and providing adequate ventilation. Ensure the cabinet’s material is non-conductive and appropriately sized for the thermometer and associated wiring. Proper grounding is crucial for safe and reliable operation within the designated enclosure.
Wiring for DIN-Rail Installation
Access internal components by removing the control knob and cover. Refer to the wiring diagram for correct electrical connections. Ensure secure connections and proper insulation of all wires. Double-check polarity before powering on the device after DIN-rail mounting is complete for optimal performance.

Advanced Features
Press the Temp button for three seconds to activate the preset 65°C temperature stage. Memory function availability depends on the specific model of the thermometer.
Preset Temperature Stages (65°C)
Activating the 65°C preset is achieved by pressing and holding the ‘Temp’ button for a duration of three seconds. This feature allows for quick temperature checks at a commonly used setting.
Memory Function (If Applicable)
This thermometer’s manual does not explicitly detail a memory function for storing previous temperature readings. Users should rely on immediate readings displayed on the screen, and note them manually if record-keeping is required for their specific application.

Warranty Information
The manual lacks specific warranty details; contact support for coverage information and assistance with any potential issues regarding the device’s functionality.
Coverage Details
Unfortunately, the provided documentation does not outline specific warranty coverage details for the 3-in-1 True Temp Thermometer. Users should directly contact the manufacturer’s support team to ascertain the duration of coverage, what defects are included, and any limitations or exclusions that may apply to their specific product.
Contact Information for Support
Regrettably, the provided excerpts lack specific contact details for support regarding the 3-in-1 True Temp Thermometer. Users are advised to consult the original product packaging, retailer, or manufacturer’s website for accurate contact information, including phone numbers, email addresses, or online support portals.

Frequently Asked Questions
Common issues involve battery leakage or heat generation if left installed for extended periods; manual shut-off conserves power, alongside automatic features.
Common Issues and Solutions
Potential problems include fluid leakage, heat generation, or even bursting if the battery remains inside for over three months of non-use. Always remove it for long-term storage! Manual shut-off and automatic features help conserve battery life, preventing these issues.
Troubleshooting Tips
If inaccurate readings occur, adjust the general deviation value (F-5) up to 1.10°C for calibration. Ensure the probe is inserted at least 1cm into the material. Remember to remove the battery during prolonged storage to avoid potential damage!